
Please, have in mind that SpyHunter offers a free 7-day Trial version with full functionality. Credit card is required, no charge upfront.
Can’t Remove “Koobface worm” pop-ups?
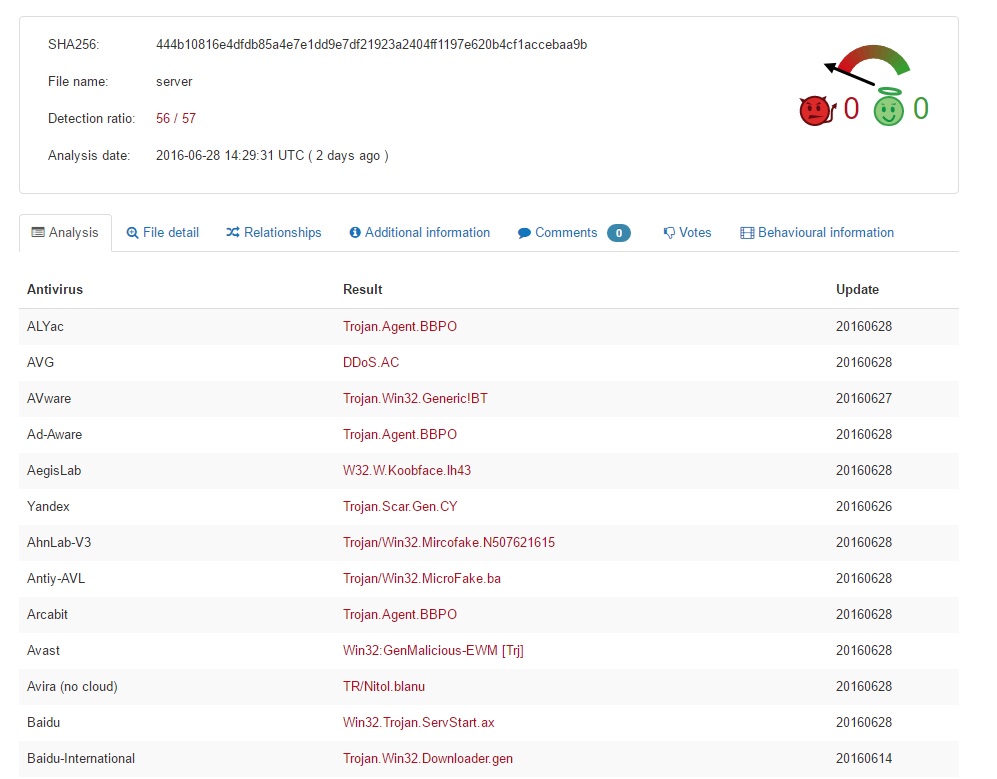
The Koobface Worm virus has many other names. As if this pest needed all of them. You might come across W32/Koobface, W32/Koobface.AZ, W32.Koobface and Boface; they’re all the same thing. Today’s article will help you get rid of the Koobface virus for good. This parasite attacks all Microsoft Windows operating systems and it quickly gets out of control. Therefore, you have to take measures before it’s too late. You’re now stuck with a worm virus. This type of infections spreads to other computers by replicating itself. As you could imagine, such a sneaky behavior causes a great headache. Do you want to send viruses to all your friends? That’s exactly what you’re doing by keeping Koobface on board. Immediately after installation, the parasite’s shenanigans begin. Koobface firstly searches for cookies from social networks. Why? Because cookies contain valuable information which allows the virus to plague your profile. Once Koobface infects your Facebook profile, for example, it starts harassing your friends. Needless to say they won’t appreciate the fact that you are sending them viruses. The parasite actually sends malicious messages which contain a hyperlink. Remember, these messages are incredibly misleading and tricky. Their one goal is to deceive PC users (in this case, your friends). Koobface Worm is indeed very problematic. Its messages usually try to pique the victims’ curiosity. “Saw that video yesterday… How could you do such a thing?”, “Why do you look so stupid? See yourself”, “You look just awesome in this new video”, “Funny video with me!”, etc. are just some of the lines the virus uses. You see, Koobface Worm has quite a lot of scenarios up its sleeve. This spam is not only annoying. It’s also harmful. Clicking the hyperlink will automatically lead your friends to dangerous websites filled with threats. In the most likely scenario Koobface will attempt to pass as an Adobe Flash Player update. Supposedly, its victims need this update in order to watch the video. It goes without saying this is how they get infected. There’s no Flash update. Instead, people download a flash_player.exe file thus installing Koobface itself. As we already mentioned, cyber worms are sneaky. Obviously, this pest compromises your own safety as well as your friends’. Since the very moment it lands on board, Koobface starts collecting your private information. That includes passwords, usernames, email addresses, browsing history, search queries, etc. If you’re particularly unlucky, though, some bank account data might also get revealed. That means hackers now have access to your most sensitive information. Is this a risk you’re willing to take? If not, uninstall the worm as soon as possible.

How did I get infected with?
The parasite applies various tricks to get installed. Probably the most popular infiltration method is freeware bundling. All you need to do in order to harm your machine is download some unverified program bundle off of the Internet. That is it. Instead of relying on your active cooperation, hackers take advantage of your haste online. To be honest, not many people pay close attention to the software they download. However, you should always be careful. A single careless click might have catastrophic consequences. Opt for the custom or Advanced option in the Setup Wizard to make sure there’s nothing malicious in the bundle. Also, actually reading the Terms and Conditions or EULA (End User License Agreement) is a good idea. If you rush towards the “I accept” button, you’re basically neglecting your safety. This is a mistake hackers are not likely to leave unpunished. Other malware distribution techniques are third-party pop-ups, illegitimate torrents, fake program updates, etc. Keep an eye out for potential threats and take care of your machine.
Why is this dangerous?
The Koobface worm virus causes indeed quite a headache. Its browser extension takes down Mozilla Firefox, Google Chrome and Internet Explorer. As you could imagine, the pop-ups are practically everywhere. Our advice is to stay away from all commercials this pest may generate because they are all untrustworthy. This program also serves as a back door to malware thus leading to more dangers and threats. Last but not least, hackers now have access to your browsing history, email addresses and IP address. Trust us, there are enough monetizing platforms online for hackers to choose from. One thing is for sure, though, crooks will find a way to make money out of your sensitive data. Keep in mind that even though identity theft is not a common scenario, it’s something that definitely must be prevented. To uninstall this nasty application manually, please follow our instructions.
How Can I Remove Koobface worm Virus Pop-ups?
Please, have in mind that SpyHunter offers a free 7-day Trial version with full functionality. Credit card is required, no charge upfront.
If you perform exactly the steps below you should be able to remove the infection. Please, follow the procedures in the exact order. Please, consider to print this guide or have another computer at your disposal. You will NOT need any USB sticks or CDs.
STEP 1: Kill the Malicious Process
STEP 3: Locate Startup Location
STEP 4: Delete unknown add-ons from Chrome, Firefox or IE
STEP 5: Permanently Remove “Koobface worm” from the windows registry.
WARNING! Stopping the wrong file or deleting the wrong registry key may damage your system irreversibly.
If you are feeling not technical enough you may use Spyhunter Professional Virus Removal Tool. However, only the Scanner is FREE, in order to remove the Koobface Worm Virus completely you need to purchase full version. >>Download SpyHunter – a professional scanner and remover.
If you feel technical enough you may proceed with Manual KoobFace Virus Removal
STEP 1: Stop the malicious process using Windows Task Manager
- Open your task Manager by pressing CTRL+SHIFT+ESC keys simultaneously
- Locate the process of the ransomware. Have in mind that this is usually a random generated file.
- Before you kill the process, type the name on a text document for later reference.

- Locate any suspicious processes associated with the Virus.
- Right click on the process
- Open File Location
- End Process
- Delete the directories with the suspicious files.
- Have in mind that the process can be hiding and very difficult to detect
STEP 2: Reveal Hidden Files
- Open any folder
- Click on “Organize” button
- Choose “Folder and Search Options”
- Select the “View” tab
- Select “Show hidden files and folders” option
- Uncheck “Hide protected operating system files”
- Click “Apply” and “OK” button
STEP 3: Locate the Virus startup location
- Once the operating system loads press simultaneously the Windows Logo Button and the R key.

- A dialog box should open. Type “Regedit”
- WARNING! be very careful when editing the Microsoft Windows Registry as this may render the system broken.
Depending on your OS (x86 or x64) navigate to:
[HKEY_CURRENT_USER\Software\Microsoft\Windows\CurrentVersion\Run] or
[HKEY_LOCAL_MACHINE\SOFTWARE\Microsoft\Windows\CurrentVersion\Run] or
[HKEY_LOCAL_MACHINE\SOFTWARE\Wow6432Node\Microsoft\Windows\CurrentVersion\Run]
- and delete the display Name: [RANDOM]

- Then open your explorer and navigate to:
Navigate to your %appdata% folder and delete the executable.
You can alternatively use your msconfig windows program to double check the execution point of the virus. Please, have in mind that the names in your machine might be different as they might be generated randomly, that’s why you should run any professional scanner to identify malicious files.
STEP 4 : Uninstall unknown programs from Your Computer
Simultaneously press the Windows Logo Button and then “R” to open the Run Command

Type “Appwiz.cpl”

Locate the any unknown program and click on uninstall/change. To facilitate the search you can arrange the programs by date. review the most recent installed programs first. In general you should remove all unknown programs.
STEP 5 : Remove add-ons and extensions from Chrome, Firefox or IE
Remove from Google Chrome
- In the Main Menu, select Tools—> Extensions
- Remove any unknown extension by clicking on the little recycle bin
- If you are not able to delete the extension then navigate to C:\Users\”computer name“\AppData\Local\Google\Chrome\User Data\Default\Extensions\and review the folders one by one.
- Reset Google Chrome by Deleting the current user to make sure nothing is left behind

- If you are using the latest chrome version you need to do the following
- go to settings – Add person

- choose a preferred name.
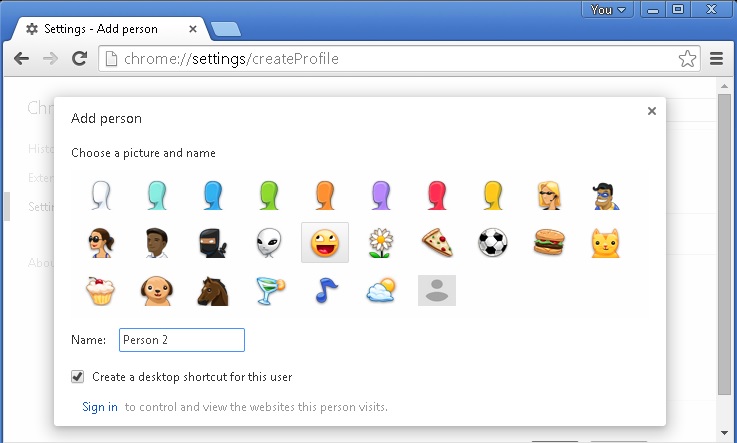
- then go back and remove person 1
- Chrome should be malware free now
Remove from Mozilla Firefox
- Open Firefox
- Press simultaneously Ctrl+Shift+A
- Disable and remove any unknown add on
- Open the Firefox’s Help Menu
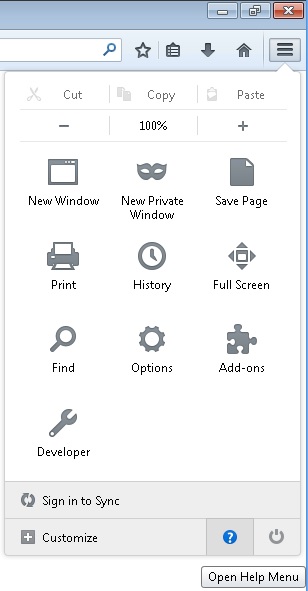
- Then Troubleshoot information
- Click on Reset Firefox

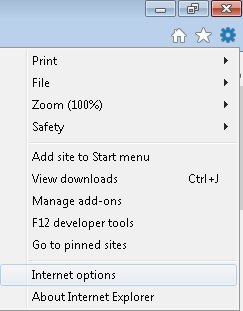
Remove from Internet Explorer
- Open IE
- On the Upper Right Corner Click on the Gear Icon
- Go to Toolbars and Extensions
- Disable any suspicious extension.
- If the disable button is gray, you need to go to your Windows Registry and delete the corresponding CLSID
- On the Upper Right Corner of Internet Explorer Click on the Gear Icon.
- Click on Internet options
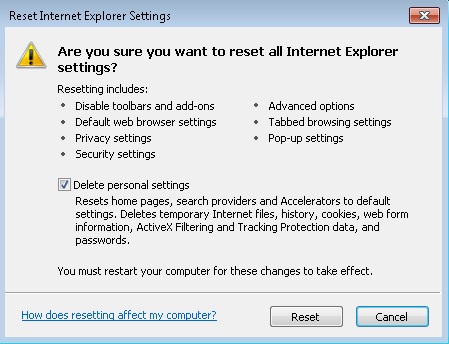
- Select the Advanced tab and click on Reset.
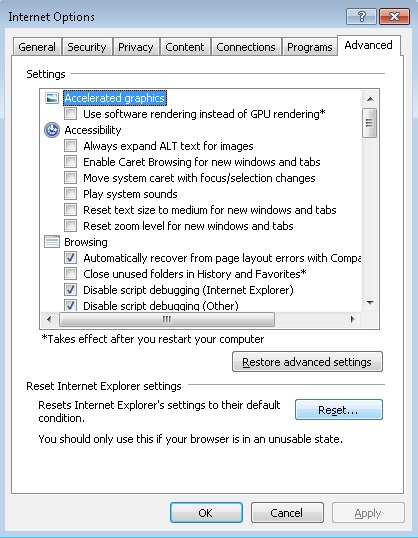
- Check the “Delete Personal Settings Tab” and then Reset
- Close IE
- Then open your explorer and navigate to:
Navigate to your %appdata% folder and delete the executable.
Navigate to %windir%/system32/Drivers/etc/host
If you are hacked, there will be foreign IPs addresses connected to you at the bottom. Take a look below:
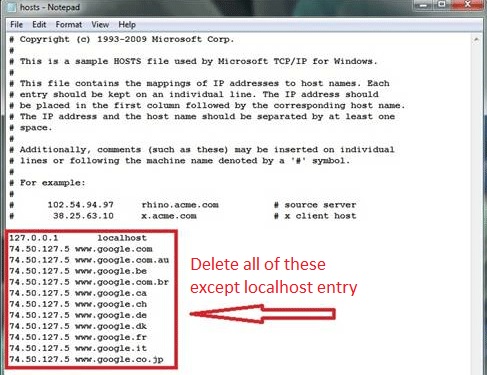
If you are uncertain about the IPs below “Localhost” contact us in out google+ profile and we will try to help you.
Double check your proxy settings as the malware is capable of modifying them.
Permanently Remove “Koobface worm” Leftovers
To make sure manual removal is successful, we recommend to use a free scanner of any professional antimalware program to identify any registry leftovers or temporary files and to prevent this from happening again.