
Please, have in mind that SpyHunter offers a free 7-day Trial version with full functionality. Credit card is required, no charge upfront.
This article can help you to remove Pfialx.dll Virus. The step by step removal works for every version of Microsoft Windows.
Pfialx.dll belongs to the dreadful Trojan category. It also goes by the name of TROJ.PFIALX.DLL. It’s a malicious infection that poses grave dangers. Not only to your system’s well-being, but also to yourself. Trojans are tremendous threats. They use slyness and finesse to sneak into your system undetected. Then, once they gain access, proceed to wreak havoc. And, make an utter mess of everything. You best understand the following. The more time the tool spends on your computer, the bigger your grievances get. At first, you begin to face minor issues. Mere inconveniences, which you may even deem insignificant. But, as time progresses, your situation escalates. Problems grow and evolve. Don’t wait around to encounter the major issues. Avoid the consequences of the Trojan’s infiltration. Do your best to rid your system of the hazardous cyber plague. Don’t allow it to spread its nastiness throughout. As soon as you become aware of its presence, act against it. Get rid of Pfialx.dll ASAP. The sooner you do, the better. It’s the best course of action. Take it now.

How did I get infected with?
The Pfialx.dll threat turns to the old but gold invasive methods. It exploits your carelessness to gain access to your PC. The usual antics include the use of freeware and spam email attachments. Or, corrupted sites or links. The Trojan can even pretend to be a bogus system or program update. Like, Java or Adobe Flash Player. It has a plethora of means, it can turn to, and slither its way in undetected. It’s up to you NOT to allow that. You’re the last line of defense. Think about it. Every time, you install tools or updates, or check out suspicious sites, be wary! Don’t give into naivety and distraction. Don’t rely on luck. Take the time to be thorough. That helps you to avoid making the mistake of allowing an infection into your PC, on accident. Don’t underestimate the importance of vigilance. It helps to keep infections out of your system. The lack thereof, does the opposite. Choose caution over carelessness.
Why is this dangerous?
After the Trojan invades, prepare for problems. It doesn’t take long before you get flooded with them. The Pfialx.dll infection eats up a lot of your free space, as well as plenty of CPU resources. That ends up slowing down your computer’s performance to a crawl. It meddles with your settings, and forces unwanted changes on you. Ones, you didn’t approve, or even knew about. The Trojan’s incessant intrusions lead to frequently-used programs crashing. Or, at the very least, refusing to work right. You face a wall of interference, every time you browse. Pop-up, in-text and banner ads, as well as redirects. Not to mention, the severe malware risk. Oh, yes. If the Trojan so wishes, it can allow the install of as many malicious tools as it chooses. That means, it can fill your PC to the brim with cyber threats. How long do you think your system will last under such circumstances? How long until it gives up, and waves the blue flag of defeat? Don’t wait around to find out. Don’t risk getting stuck with The Blue Screen of Death. Don’t allow the Trojan to run rampant on your PC, and mess everything up. Do your best to get rid of the nasty Pfialx.dll threat ASAP. Don’t delay its deletion. Delays have repercussions.
Manual Pfialx.dll Removal Instructions

Please, have in mind that SpyHunter offers a free 7-day Trial version with full functionality. Credit card is required, no charge upfront.
The Pfialx.dll infection is specifically designed to make money to its creators one way or another. The specialists from various antivirus companies like Bitdefender, Kaspersky, Norton, Avast, ESET, etc. advise that there is no harmless virus.
If you perform exactly the steps below you should be able to remove the Pfialx.dll infection. Please, follow the procedures in the exact order. Please, consider to print this guide or have another computer at your disposal. You will NOT need any USB sticks or CDs.
STEP 1: Track down Pfialx.dll related processes in the computer memory
STEP 2: Locate Pfialx.dll startup location
STEP 3: Delete Pfialx.dll traces from Chrome, Firefox and Internet Explorer
STEP 4: Undo the damage done by the virus
STEP 1: Track down Pfialx.dll related processes in the computer memory
- Open your Task Manager by pressing CTRL+SHIFT+ESC keys simultaneously
- Carefully review all processes and stop the suspicious ones.

- Write down the file location for later reference.
Step 2: Locate Pfialx.dll startup location
Reveal Hidden Files
- Open any folder
- Click on “Organize” button
- Choose “Folder and Search Options”
- Select the “View” tab
- Select “Show hidden files and folders” option
- Uncheck “Hide protected operating system files”
- Click “Apply” and “OK” button
Clean Pfialx.dll virus from the windows registry
- Once the operating system loads press simultaneously the Windows Logo Button and the R key.

- A dialog box should open. Type “Regedit”
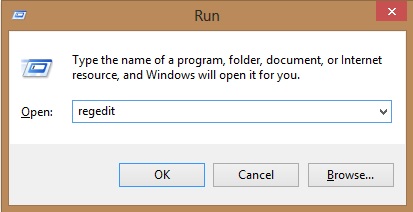
- WARNING! be very careful when editing the Microsoft Windows Registry as this may render the system broken.
Depending on your OS (x86 or x64) navigate to:
[HKEY_CURRENT_USER\Software\Microsoft\Windows\CurrentVersion\Run] or
[HKEY_LOCAL_MACHINE\SOFTWARE\Microsoft\Windows\CurrentVersion\Run] or
[HKEY_LOCAL_MACHINE\SOFTWARE\Wow6432Node\Microsoft\Windows\CurrentVersion\Run]
- and delete the display Name: [RANDOM]

- Then open your explorer and navigate to: %appdata% folder and delete the malicious executable.
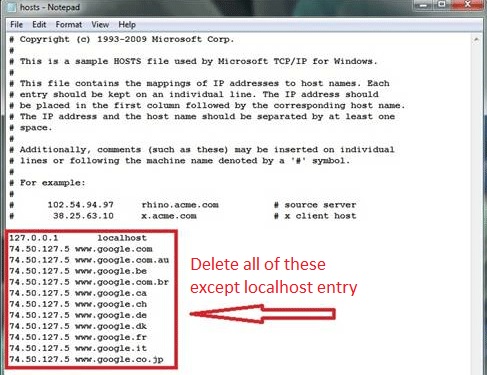
Clean your HOSTS file to avoid unwanted browser redirection
Navigate to %windir%/system32/Drivers/etc/host
If you are hacked, there will be foreign IPs addresses connected to you at the bottom. Take a look below:
Step 4: Undo the possible damage done by Pfialx.dll
This particular Virus may alter your DNS settings.
Attention! this can break your internet connection. Before you change your DNS settings to use Google Public DNS for Pfialx.dll, be sure to write down the current server addresses on a piece of paper.
To fix the damage done by the virus you need to do the following.
- Click the Windows Start button to open the Start Menu, type control panel in the search box and select Control Panel in the results displayed above.
- go to Network and Internet
- then Network and Sharing Center
- then Change Adapter Settings
- Right-click on your active internet connection and click properties. Under the Networking tab, find Internet Protocol Version 4 (TCP/IPv4). Left click on it and then click on properties. Both options should be automatic! By default it should be set to “Obtain an IP address automatically” and the second one to “Obtain DNS server address automatically!” If they are not just change them, however if you are part of a domain network you should contact your Domain Administrator to set these settings, otherwise the internet connection will break!!!
- Check your scheduled tasks to make sure the virus will not download itself again.
How to Permanently Remove Pfialx.dll Virus (automatic) Removal Guide
Please, have in mind that once you are infected with a single virus, it compromises your whole system or network and let all doors wide open for many other infections. To make sure manual removal is successful, we recommend to use a free scanner of any professional antimalware program to identify possible virus leftovers or temporary files.