
Please, have in mind that SpyHunter offers a free 7-day Trial version with full functionality. Credit card is required, no charge upfront.
Can’t Remove VirtualDesktopKeeper ads? This page includes detailed ads by VirtualDesktopKeeper Removal instructions!
VirtualDesktopKeeper falls under the adware umbrella. The program is a typical representative of the category. It uses deception and finesse to invade your system, undetected. Then, once inside, wreaks havoc, and messes everything up. The tool forces an entire array of grievances on you. The longer you allow it to remain, the more issues it throws at you. The unpleasantness begins with your browsing. One day, you come to find that something as simple as going online, has become a nightmare. You get interrupted at every turn. The adware puts you through an utter bombardment of interference. The tool floods you with advertisements. Every type of ad there is, you see on your screen. Pop-up, in-text, banner. It’s a plethora of pop-ups every time you so much as touch your browser. And, not only that, but you also get redirected. VirtualDesktopKeeper redirects you to a variety of suspicious-looking sites. Remember to click nothing! All, you see is malicious and trustworthy! Press a single pop-up, and you risk ending up with more unwanted malware. So, avoid clicks as best as you can. Or, better yet, make the interference cease. Delete the infection the first chance you get. Don’t let it spread its nastiness throughout, and cause irrevocable damages. Its prompt removal saves you a ton of troubles, and headaches. And, gets you the gratitude of your future self. So, do what’s best for you, and your PC. Locate the exact hiding place of VirtualDesktopKeeper. Then, delete it on discovery. Do it ASAP.

How did I get infected with?
The infection turns to the old but gold methods to invade. It uses spam emails, freeware, fake updates, the usual antics. And, tricks you into installing it, yourself. All while keeping you clueless. It may seem a bit confusing, but it’s pretty simple. Adware tools, like VirtualDesktopKeeper, need user’s permission to enter a PC. Without receiving it, they cannot proceed with installment. So, they make sure to get it. But if an infection outright pops up to ask your permission on its install, would you give it? Odds are, no. To avoid the risk of rejection, the application makes sure to ask the ‘right’ way. It seeks your consent in the sneakiest way possible. As mentioned, it uses the old but gold means of infiltration. If you’re not thorough enough to catch it in the act, that’s it. It slips right by you, unnoticed. And, you get buried in troubles. Don’t allow that. Understand that the adware tool preys on your carelessness. If you provide it, its invasion is that much easier. So, don’t. Instead, be extra attentive. Take the time to read the terms and conditions, when installing tools, or updates. Anything you get off the web deserves more attention. The web is a dangerous place. So, don’t underestimate it. Don’t rush, or give into naivety. Double-check everything. And, always do your due diligence. Caution offers a better alternative than carelessness.
Why is this dangerous?
VirtualDesktopKeeper doesn’t only mess up your browsing. It also puts your privacy in grave danger. That’s because the tool tries to steal and expose your private information. It’s designed that way. And, make no mistake! Given enough time, it WILL succeed. The question is, will you grant it the time it needs? Here’s a hint: don’t! As soon as the adware settles on your PC, it starts to spy on you. It keeps track of your browsing activities, and records everything. That’s right. The infection catalogs your every online move. That means, it has access to your personal and financial details. Once the tool decides it has stolen enough information from you, it sends it. It exposes it to the unknown third parties that published it. That means, strangers get a hold of your most sensitive data. Cyber criminals with questionable intention. Are you going to allow that? Or, would you rather, your privacy remain private? Do yourself a favor, and pick the latter. Protect your system from the adware’s harmful touch. Keep the infection from stealing your private details, only to then hand it over to strangers. Once you become aware of the adware’s existence, act! VirtualDesktopKeeper has NO place on your PC. Delete it the first chance you get.
How to Remove VirtualDesktopKeeper virus

Please, have in mind that SpyHunter offers a free 7-day Trial version with full functionality. Credit card is required, no charge upfront.
The VirtualDesktopKeeper infection is specifically designed to make money to its creators one way or another. The specialists from various antivirus companies like Bitdefender, Kaspersky, Norton, Avast, ESET, etc. advise that there is no harmless virus.
If you perform exactly the steps below you should be able to remove the VirtualDesktopKeeper infection. Please, follow the procedures in the exact order. Please, consider to print this guide or have another computer at your disposal. You will NOT need any USB sticks or CDs.
STEP 1: Track down VirtualDesktopKeeper in the computer memory
STEP 2: Locate VirtualDesktopKeeper startup location
STEP 3: Delete VirtualDesktopKeeper traces from Chrome, Firefox and Internet Explorer
STEP 4: Undo the damage done by the virus
STEP 1: Track down VirtualDesktopKeeper in the computer memory
- Open your Task Manager by pressing CTRL+SHIFT+ESC keys simultaneously
- Carefully review all processes and stop the suspicious ones.

- Write down the file location for later reference.
Step 2: Locate VirtualDesktopKeeper startup location
Reveal Hidden Files
- Open any folder
- Click on “Organize” button
- Choose “Folder and Search Options”
- Select the “View” tab
- Select “Show hidden files and folders” option
- Uncheck “Hide protected operating system files”
- Click “Apply” and “OK” button
Clean VirtualDesktopKeeper virus from the windows registry
- Once the operating system loads press simultaneously the Windows Logo Button and the R key.

- A dialog box should open. Type “Regedit”
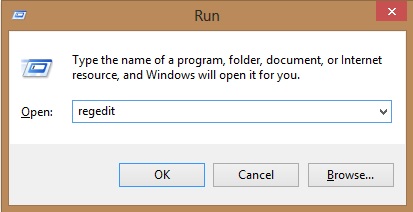
- WARNING! be very careful when editing the Microsoft Windows Registry as this may render the system broken.
Depending on your OS (x86 or x64) navigate to:
[HKEY_CURRENT_USER\Software\Microsoft\Windows\CurrentVersion\Run] or
[HKEY_LOCAL_MACHINE\SOFTWARE\Microsoft\Windows\CurrentVersion\Run] or
[HKEY_LOCAL_MACHINE\SOFTWARE\Wow6432Node\Microsoft\Windows\CurrentVersion\Run]
- and delete the display Name: [RANDOM]

- Then open your explorer and navigate to: %appdata% folder and delete the malicious executable.
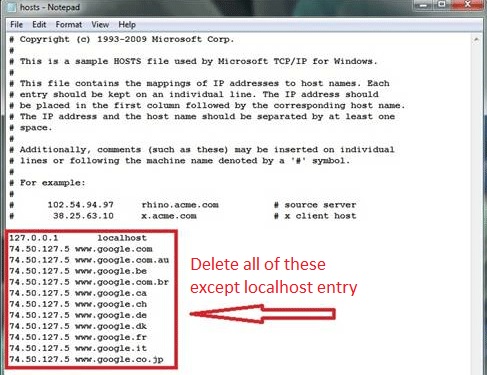
Clean your HOSTS file to avoid unwanted browser redirection
Navigate to %windir%/system32/Drivers/etc/host
If you are hacked, there will be foreign IPs addresses connected to you at the bottom. Take a look below:
STEP 3 : Clean VirtualDesktopKeeper traces from Chrome, Firefox and Internet Explorer
-
Open Google Chrome
- In the Main Menu, select Tools then Extensions
- Remove the VirtualDesktopKeeper by clicking on the little recycle bin
- Reset Google Chrome by Deleting the current user to make sure nothing is left behind

-
Open Mozilla Firefox
- Press simultaneously Ctrl+Shift+A
- Disable the unwanted Extension
- Go to Help
- Then Troubleshoot information
- Click on Reset Firefox

-
Open Internet Explorer
- On the Upper Right Corner Click on the Gear Icon
- Click on Internet options
- go to Toolbars and Extensions and disable the unknown extensions
- Select the Advanced tab and click on Reset

- Restart Internet Explorer
Step 4: Undo the damage done by VirtualDesktopKeeper
This particular Virus may alter your DNS settings.
Attention! this can break your internet connection. Before you change your DNS settings to use Google Public DNS for VirtualDesktopKeeper, be sure to write down the current server addresses on a piece of paper.
To fix the damage done by the virus you need to do the following.
- Click the Windows Start button to open the Start Menu, type control panel in the search box and select Control Panel in the results displayed above.
- go to Network and Internet
- then Network and Sharing Center
- then Change Adapter Settings
- Right-click on your active internet connection and click properties. Under the Networking tab, find Internet Protocol Version 4 (TCP/IPv4). Left click on it and then click on properties. Both options should be automatic! By default it should be set to “Obtain an IP address automatically” and the second one to “Obtain DNS server address automatically!” If they are not just change them, however if you are part of a domain network you should contact your Domain Administrator to set these settings, otherwise the internet connection will break!!!
You must clean all your browser shortcuts as well. To do that you need to
- Right click on the shortcut of your favorite browser and then select properties.
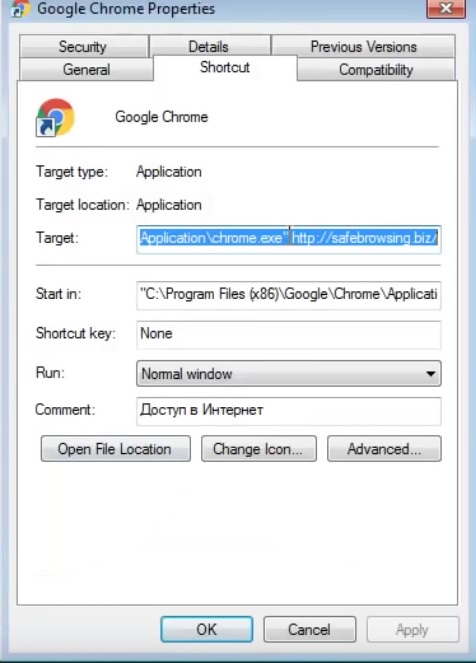
- in the target field remove VirtualDesktopKeeper argument and then apply the changes.
- Repeat that with the shortcuts of your other browsers.
- Check your scheduled tasks to make sure the virus will not download itself again.
How to Permanently Remove VirtualDesktopKeeper Virus (automatic) Removal Guide
Please, have in mind that once you are infected with a single virus, it compromises your system and let all doors wide open for many other infections. To make sure manual removal is successful, we recommend to use a free scanner of any professional antimalware program to identify possible registry leftovers or temporary files.